Before You Begin — Environment Setup
Introduction
This document walks you through everything you need to do before Session 1. By the time you finish, you will have five tools set up and your own copy of the workshop code ready to go.
Complete these steps on your own before the first session. If you run into problems, see the Getting Help section at the bottom.
The Tool Stack
This workshop uses five tools. Each one has a specific job; none of them overlap. You do not need to install Python separately. Python comes bundled with Miniconda.
1. VS Code is the code editor. It is where you will read and write Python files. It also has a built-in terminal panel where you run all your commands without switching windows.
2. Git Bash is a command-line terminal for Windows that is included automatically when you install Git. You will use it as the built-in terminal inside VS Code. Every command you run in this workshop, such as activating the conda environment, running Python scripts, committing your work, happens here.
3. Miniconda (conda) is an environment manager. It installs Python and creates an isolated environment (a named set of packages at specific versions) so that this project’s dependencies do not interfere with anything else on your computer. Every participant runs the exact same version of every package.
4. Git is version control. It records every change you make to your code so you can see what changed, when, and why, and undo it if something breaks.
5. GitHub is a cloud platform for storing and sharing Git repositories. It is where the workshop code lives and where you will back up your work. You need a free account; no software installation required.
How They Connect
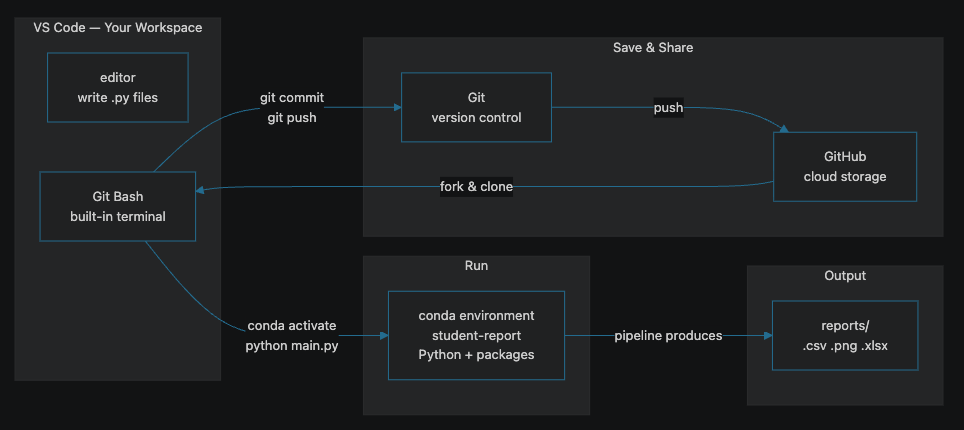
You write Python files in the VS Code editor. Git Bash, running as the built-in terminal inside VS Code, is where you type commands. Those commands activate the conda environment to run your code, produce the output files, and save your work to Git and GitHub.
A Note on GSU Managed Machines
These tools should install on GSU-managed computers without administrator credentials. If an installer asks for a password you do not have, double-check that you are following the steps correctly.
If the prompt persists, contact the GSU Technology Help Desk and ask them to install Miniconda, Git, and VS Code before Session 1.
Allow 30–60 minutes for the full setup, not including any IT wait time.
Installation Steps
Open each installer and follow the steps below. All steps assume a Windows 11 machine.
Step 1 — Miniconda
Miniconda installs both conda and Python. You do not need to install Python separately.
Download the latest 64-bit Windows installer from the Miniconda download page. Select the most recent version.
Run the installer. When you reach the Advanced Installation Options screen, check “Add Miniconda3 to your PATH environment variable.” Accept all other defaults.
Click Install, then Finish.
Open a new Command Prompt (
Win + R, typecmd, press Enter) and run:conda --versionYou should see output like
conda 24.x.x. If you see an error, re-run the installer and confirm the PATH option was checked.
Video walkthrough: Downloading and Installing Miniconda3
Step 2 — GitHub Account
- Go to github.com and click Sign Up.
- Follow the prompts to create a free personal account.
- Verify your email address when GitHub sends you a confirmation message.
You do not need a paid plan or an organization account. A free personal account is all that is required.
Step 3 — Git and Git Bash
Git Bash is included automatically with the Git for Windows installer. There is no separate download needed.
Download the Windows installer from the Git download page. Select the most recent version at the top of the page.
Run the installer. Accept all default options on every screen. On the Choosing the terminal emulator screen, confirm that “Use MinTTY (the default terminal of MSYS2)” is selected. (This is Git Bash)
Click Install, then Finish.
Open a new Command Prompt and run:
git --versionYou should see output like
git version 2.x.x.
Configure Git
Git needs your name and email to label your commits. Run these two commands in Git Bash, replacing the values with your own name and the email address you used to create your GitHub account:
git config --global user.name "Your Name"
git config --global user.email "you@example.com"
Verify the settings saved:
git config --listYou should see user.name and user.email in the output.
Video walkthrough: Installing Git on Windows
Step 4 — Visual Studio Code
Download the Windows installer from the VS Code download page.
Run the installer and accept all default options.
Reboot your computer before continuing.
Open a new Command Prompt and run:
code --versionYou should see a version number on the first line (e.g.,
1.9x.x).
Set Git Bash as the built-in terminal
VS Code detects Git Bash after installation but does not set it as the default terminal automatically. Do this once:
- Open VS Code.
- Open Settings with
Ctrl + ,. - Search for
terminal.integrated.defaultProfile.windows. - In the dropdown, select Git Bash.
- Open a new terminal with
Ctrl + `(backtick). The terminal panel should showbashin the upper right.
Video walkthrough: Setting Git Bash as the default terminal in VS Code
Install the Python Extension
VS Code needs the Python extension to understand .py files and find conda environments.
- Click the Extensions icon in the left sidebar (or
Ctrl+Shift+X). - Search for Python.
- Install the extension published by Microsoft (extension ID:
ms-python.python).
If the extension is already installed, you will see a gear icon instead of an Install button.
Video walkthrough: Installing VSCode on Windows
Setup Checks
Before Session 1, confirm all three tools are working. Open Git Bash (search for “Git Bash” in the Windows Start menu) and run each command:
| Command | Expected output |
|---|---|
conda --version |
conda 24.x.x (or similar) |
git --version |
git version 2.x.x (or similar) |
code --version |
A version number, e.g. 1.9x.x |
git config --list |
Lines including user.name and user.email |
Running these checks in Git Bash, rather than Command Prompt, also confirms that Git Bash itself is working correctly.
If any command returns an error or command not found, see Getting Help below before Session 1.
Fork the Workshop Repo
Forking creates your own copy of the workshop code on GitHub. Your changes stay in your fork and do not affect anyone else.
- Go to github.com/GSU-Analytics/automating-analytics-workshop.
- Click the Fork button in the upper right.
- Accept the defaults and click Create fork.
Your fork will appear at:
https://github.com/YOUR-USERNAME/automating-analytics-workshopStop here. You will clone your fork to your computer at the start of Session 2, under instructor guidance.
Getting Help
If setup is not complete before Session 1, bring your laptop and let the instructor know at the start of the session.
| Issue | Contact |
|---|---|
| Can’t install software (no admin rights) | GSU Technology Help Desk — technology.gsu.edu |
| Pre-workshop questions and troubleshooting | Teams channel link |
| Office hours | Directly after each workshop session |
Teams channel: The workshop has a dedicated Microsoft Teams channel for questions, troubleshooting, and announcements. Join before Session 1 so you have a place to ask for help with setup. Join the Teams chat here.
VPN (Off-Campus Only)
VPN is not required during workshop sessions. When you are on campus and connected to GSU WiFi, your computer is already within the GSU network and can reach the training database used in Sessions 9 and 10.
If you plan to work on exercises off-campus, you will need to connect via VPN first. Setup instructions are on the GSU Technology — Virtual Private Network page.
Additional Resources
Cheat sheets
Video walkthroughs